April 2007


road1.jpg
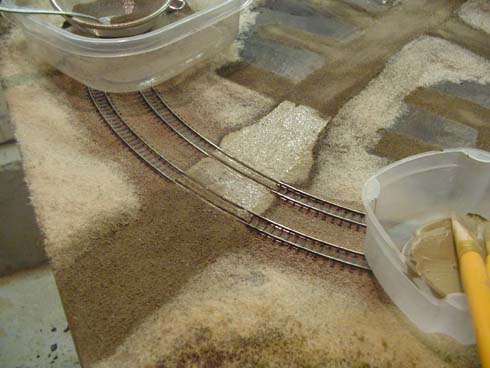
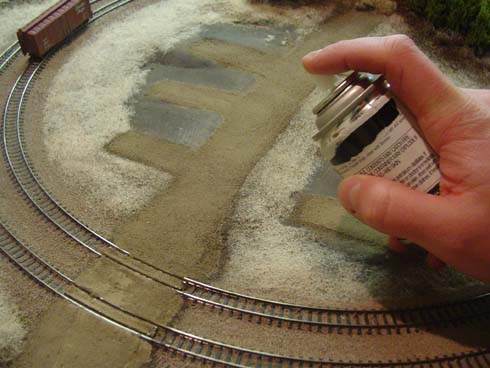
Having already applied the basic groundcover and the ballast, I started ‘paving’ some n scale roads. As I envisioned the town as being rustic, I wanted the scenery to reflect that, and chose to make a dirt road as opposed to asphalt.

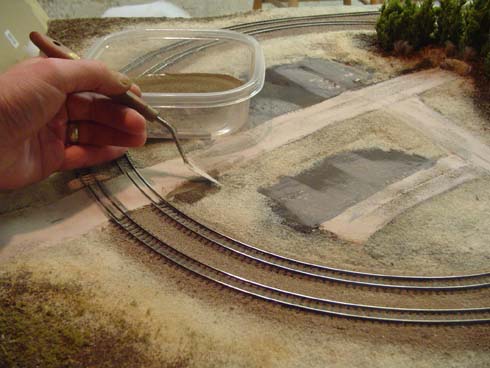
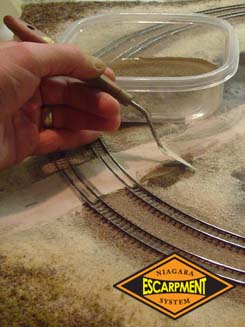
I first started building up the shoulders around the crossing by shaping some sifted dirt with a palette knife. Once I was satisfied with the slope, I misted the dirt with wet water and applied diluted 50/50 water/white glue. I next brushed on a thin coat of white glue the tops of the roads, and then carefully sifted fine dirt over top of both the shoulders and the road tops. I again misted the dirt with the 50/50 in hopes of encouraging the glue to soak into all the dirt.

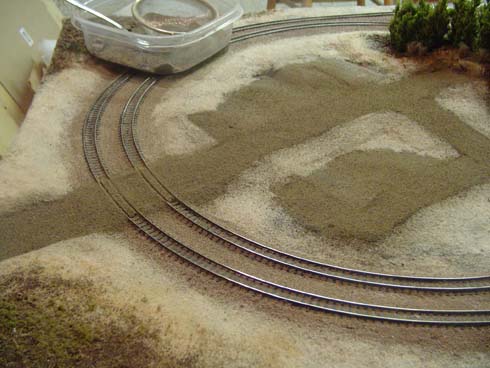
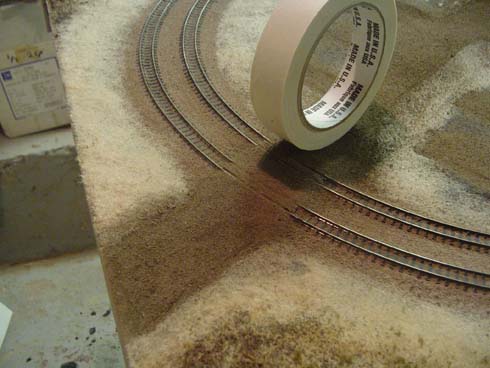
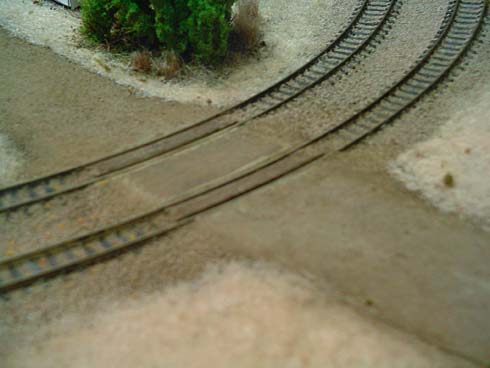
When I examined the results the next morning, I was disappointed to find that the dirt had not returned to its original light colour, but had dried much darker, and wet looking! Unlike ballast, dirt doesn’t dry to its original colour. Discouraged, I vacuumed up all the loose dirt, and applied a coat of light tan paint atop the road top and shoulders, and again sifted dirt over the paint. This time, I also used a roll of masking tape as a roller, and packed the dirt down by gently rolling the tape back and forth.

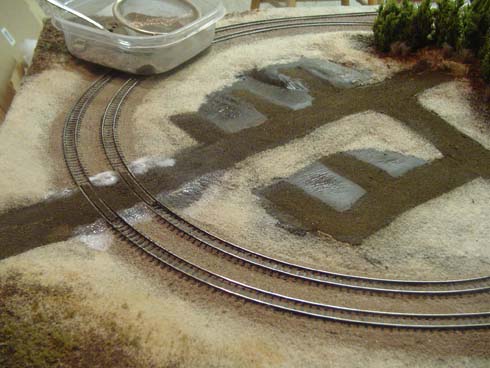
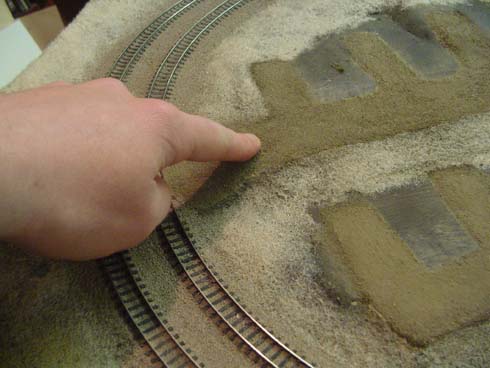
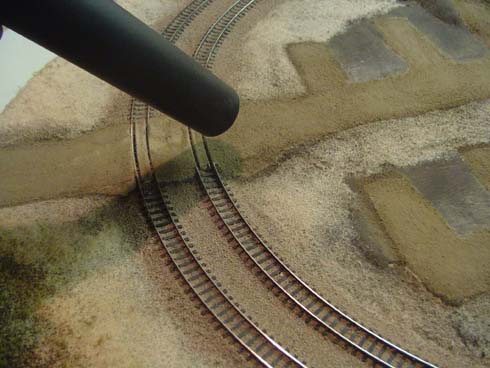
The next day, I vacuumed up all the loose dirt, and then proceeded to scrub the surface of the road with my finger to loosen any stray particles, as well smooth the surface. I vacuumed us the excess, and this time was pleased to find the road now closely matched the original colour of the dry dirt. As a precaution, I sprayed everything with a few light mists of Testor’s Dullcote. (I made sure they coats were light ‘ I didn’t want to darken the dirt again!
road2.jpg

road3.jpg

road4.jpg

road5.jpg

road6.jpg

road7.jpg

road8.jpg

road9.jpg

road10.jpg

road11.jpg

funfur1.jpgOnce I had installed the majority of the cedar trees on the NES, I noticed that despite best efforts, the tapering braches at the base of the trees had create gaps that allowed me to see right through the bush. A drive to work revealed that real cedars have a great deal of underbrush growth that covers the base of the trees. I wasn’t interested in trying to duplicate the rich variety of plant life found in nature, but simply suggest that there were more then just trees, so I decided to focus on the large bushy dogwoods that typically line the edge of a cedar bush. I could have modeled hundreds of different species of plant, but what I was after was the suggestion, not a prototypical representation of the local fauna and flora.

I quick trip to our local fabric store revealed a huge selection of different fun furs, and two varieties that I selected for my n scale Niagara Escarpment System. The first was a form of ‘wolf-fur’, that had a mix of short and long light and dark hairs that closely resembled the grey thickets at the base of our local cedars. The second fur was a honey-coloured, very dense teddy-bear fur that was an almost identical colour match to the dead grass on the model railroad.

Installation was straightforward. First I dampened the area I wanted to plant the shrubs in with a bit of wet water. I clipped off a small clump of fun fur with some scissors, dipped the cut-end into the 50/50 water/white glue, and planted it on the layout. The wet water helped to ‘wick’ up the glue, so that the fur didn’t have a glob of clear glue at its base once everything had dried. Before the glue set, I tapped the centre of the bush with the sharp tip of my awl to help spread the fur fibers out in slight fan pattern

After letting the shrubs dry overnight, I measured them in the morning to find that they were about 10 feet tall ‘ a prototypical height in many cases, but too tall for my tastes, I pruned the fur with some scissors, and spread the clipping around the fixed shrubs. Happy with the results, I gave the entire area a quick blast of Testor’s Dullcote to help fix everything in place, as well as kill the shine of the fun-fur.

funfur2.jpg

funfur3.jpg

funfur4.jpg

funfur5.jpg

cedar0.jpgSouthwestern Ontario is typified by its unique mix of deciduous and coniferous trees, especially its mix of cedars, pines, spruce, maples, oaks and birch trees. For my n scale NES model railroad, I wanted to create the look of low-lying cedar bush, so I needed to find an inexpensive and quick way to create cedars trees. After a few experiments, I found the following technique allowed me to make a great number of trees at minimal cost and with great speed.

The key to making these trees was finding natural plant specimens that closely suggested the shape of a cedar ‘ I found a suitable solution in an abundant roadside wetlands grass commonly referred to as Pampas Grass or Pampas Plume (Cortaderia selloana). The ends of this grass are made up of dozens of feathery plumes that closely resemble the conical shape of cedars.

I first removed a small plume from the plant, and loosely wound it around some fine wire; the individual plumes are far too flimsy without the added rigidity of the wire. Once I had prepared 5-10 plumes, I gave each tree a quick spray of flat brown spray paint, and immediately sifted on some fine green ground foam. I followed this with a few pumps of cheap hairspray, and then applied a second coat to ground foam to fill in any gaps/imperfections, as well as create greater density.

I let the trees dry for about 10 minutes, and then planted them in the foam scenery base. Using an awl, I punched a small hole in the Styrofoam, and using some tweezers, pushed the tree down into the hole. After I had planted a few trees, I used an eyedropper to soak the base of the trees with some 50/50 white/glue mixture. In an hour I was able to build and plant about 25 trees, which covered an area of about 16 square inches, at a cost of about $0.05 a tree.

Looking back, the texture of the trees is perhaps a bit coarse for the look of cedars, however en mass they do effectively suggest a cedar bush. Hence, I’m happy!

cedar1.jpg

cedar2.jpg

cedar4.jpg

cedar3.jpg

cedar5.jpg

cedar6.jpg

cdar7.jpg

cedar7.jpg

cedar8.jpg

cedar9.jpg

cedar10.jpg

cedar11.jpg

Having ‘planted’ the dead grass, I was left with the problem of how I should model dead leaves and underbrush. The simple solution would have been to go outside and get some dead leaves; however the foot of snow on top of them was discouraging. As an alternative, I purchased a couple of cheap cigars at the corner store, and ground them up in a coffee grinder. Once sifted, the pulverized cigar produced a wonderfully coloured dead-leaf matter! Following on the success of the ground cigars, I ground up some twigs from our gutters. (An ice dam leaked water into the kitchen, and I was forced to climb onto the roof with an axe to remedy the problem!) The twigs are actually part of the leaves from our walnut tree so they are less woody then actual twigs. Once pulverized by the coffee grinder, they produced a wonderful dark mulch of fine ‘branches’. Finally, I hacked at the ground outside until I managed to get a small scraping of dirt from the garden that I dried in the oven, and sifted.

The application of materials was quite straightforward. First, I applied a 50/50 wash of white glue and water to the upper parts of the hill and applied a second coat of static grass ‘ this improved the thickness/density of the previous application, and helped to add some variation in the colour. Next I sifted on some of the fine cigar leaves, and then sprinkled on some of the coarser material. Satisfied with the look thus far, I then spooned/sprinkled on some of the ground twigs. I made sure that each successive layer of groundcover receded back from the edge of the previous. With each of the layers of groundcover applied, I misted everything with wet water (water with a drop of detergent added) and drizzled on more of the 50/50 water/glue.

The next day when I looked over the results, I was pleasantly surprised to find that the cigars had actually dyed the glue mixture, and had leached down the hillside. The results added great colour variation to the grass, and helped blend the transition between the grass and the underbrush.

I repeated the steps for the areas surrounding the rock faces, but this time elected to add some of the sifted dirt and some small rocks, as well as some ground foam. Again, I was happy with the end results.

gr1.jpg

gr2.jpg

gr3.jpg

gr4.jpg

gr5.jpg

gr6.jpg

gr7.jpg

gr8.jpg

gr9.jpg

gr10.jpg

gr11.jpg

gr12.jpg

Having stared at the ‘Styrofoam-Central’ for several weeks, I was eager to begin adding some scenery, or at the very least hide the pink and beige contours of the layout’s hills! I started by applying a coat of deep brown craft paint to the hillsides. I’ve read many times that modellers prefer to use a light tan colour as their base coat, but as I was modeling early winter, it seemed only logical to use a mud colour. I waited for the paint to dry thoroughly, and then brushed on a coat of full strength white glue. While the glue was still wet, I applied a coat of Woodland Scenics static grass. Despite what I’ve read, I could not make he grass stand up like real grass no matter what I did! Apparently if you shake and squeeze the bottle of static grass when you apply it, it should in theory stand up strait in the glue, but in my case, it fell flat. I applied enough grass to cover the glue, but not so much that it was opaque. I wanted the dark brown paint colour to show through the grass in areas ‘ to help with the illusion that the normally green grass had matted down into the mud with the change in seasons. I waited for the glue to dry thoroughly before vacuuming up the excess with a shop vac.

gc1.jpg

gc2.jpg

gc3.jpg

gc4.jpg

gc5.jpg

gc6.jpg

gc7.jpg

gc8.jpg

gc9.jpg

I decided that I wanted to build a ‘dirt’ crossing for the NES, as I wanted to keep things looking rural and rough. While I’m sure my finished product isn’t 100% prototypical, it did allow me to create a crossing with great ease, and looks appropriate for the rest of the layout.

I first started by cutting some leftover rails to appropriate lengths, and after gently curving them with my fingers, I glued them to the ties between the mainlines using CA. I used the cast rail spikes of the flex track as spacers ‘ butting the guard rails against them. Once the glue had dried, I filled between the rails using the coloured drywall compound and a palette knife. Using a larger palette knife, I built up the approaches to the crossing ‘ making sure none of the mud got down between the rails.

Once the mud had dried, I applied some masking tape over the guard rails, as well as down the sides of the road to establish the basic shape of the crossing. Again, using a large palette knife, I smoothed in the drywall mud, allowing the excess to spill over onto the tape. Satisfied with the result, I then carefully peeled away the tape.

Once dry, I chipped off the excess mud, and then built the banks around the crossing again using a small pallette knife.

crossing1.jpg

crossing1b.jpg

crossing2.jpg

crossing3.jpg

crossing4.jpg

crossing5.jpg

crossing6.jpg

crossing8.jpg

crossing81.jpg

mud1.jpgWith the majority of Styrofoam terrain established on the NES, I needed to add the rock-faces, as well as smooth out the contours of the landscape. For rocks, I used a Woodland Scenics rubber mold that I had purchased a few years ago. Rather then Hydrocal, I used standard plaster of paris for the rocks as again, it was what I had handy. Hydrocal is substantially stronger then regular plaster of paris, but as no one is going to be standing on these rocks, I wasn’t worried. Once the rock casts had completely dried in the molds, I removed them and cut them to fit into the contours of the foam scenery.

With the rocks ready for installation, I smoothed the landscape with a coat of tinted drywall mud. Typically, most people would generally skim-coat they landscape with plaster, but again, I had two pails of drywall compound handy from our ever-ongoing house renovations. As well, drywall mud needs at least 24 hours to dry, which allows for a much greater working time, and isn’t as messy as plaster.

I mixed in some cheap brown craft paint to cut the whiteness of the mud, as well as ensure that later when drilled, the dust created would be tinted and not stark white.

I applied coats of mud to the underside of the rocks, and pressed them into each of their respective locations, and then smoothed around them with a small trowel. In about 20 minutes, I had completely coated the layout with drywall mud ‘ what a difference!

mud2.jpg

mud3.jpg

mud7.jpg

mud4.jpg

mud5.jpg

mud6.jpg

I wanted to the layout to have a somewhat finished look, as well as have some added durability (as it would likely get moved around), so I installed the fascia. I purchased 1/8″ masonite hardboard and ripped them into manageable strips. I temporarily fastened each strip of masonite to the side of the layout using wood screws. I traced the contour of the terrain onto each board, removed the screws, and cut along each line using a jigsaw. I also cut to access holes in two of the fascia pieces so that in the case of derailment, I would be able to reach inside the layout.

I reattached the masonite strips to the side of the layout, making certain that I lined up the screws with their original holes, and ensuring I applied a generous coat of PL300 adhesive to the Styrofoam, and wood glue to the base of the frame and tightened the screws. As a finishing touch I added corner bead to the outside edges of the layout ‘ again adding some additional durability, as well as hiding any imperfections in the cuts.

Later, I will remove the screws once the glue has dried.

fascia1.jpg

fascia2.jpg

fascia3.jpg

houses1.gifAs the Niagara Escarpment System model railroad is a test bed for modeling techniques I haven’t tried (which is all of them as this is my first railroad..), I decided that I would like to build a simple town. After browsing through a number of publications, as well as the Walther’s website, I found that most manufacturers didn’t offer buildings that were appropriate for the era and region I’m modeling. Southwestern Ontario is dotted with a number of architectural styles, such as Canadian Gothic, as well as a number of war-time style homes, and basic two-story dwellings. As such, I decided that it would be a good time to scratch-build the small town.

In order to get a better sense of how a town might look, I built a simple architectural model of what a standard house in the Niagara region might look like. Having built a number of ‘real’ homes, it was a simple process to create a roughly proportioned, scale structure that was a decent facsimile of local buildings. I visited the Tichy Train Group website and downloaded some images of their frame windows, and then inserted them into my drawing. Satisfied with the result I was able to print out the drawings on regular bond paper, and with a pair of scissors and a little tape, fashioned 6 scale houses. (You are welcome to download the drawing here housetemplate.pdf)

With my small community in hand, I began arranging the houses on the hill of the west-side of the NES until I had designed a community that was pleasing. I traced the basic footprint of each of the houses, and then began creating streets. Using leftover cork roadbed, I carved away at the foam terrain, and glued down the cork until I had a fairly level set of streets. I replaced the houses, and made additional rough adjustments to the hillsides until things looked right. Satisfied with the overall look, I ordered the windows and Doors from the Tichy Train Group ‘ I hope I eventually find the time to put them to good use!

house1.jpg

house2.jpg

From the beginning of this project, I have always promised myself that I would strive to find the easiest/simplest way to do something – and keep mess-making to a minimum! Hence, when I started building the scenic contours on my n scale Niagara Escarpment System (NES) model railroad, there was no way I would use any sort of lattice-webbing-plaster-soaked-paper-towel technique. Rather, I decided to create the landforms using the ever-popular technique of stacked extruded Styrofoam sheets. Typically arranged in a wedding cake fashion, the Styrofoam techniques allows you to build landforms quickly, carve contours, and sand imperfections, all the while offering incredible structural stability.

In my case, I needed to create some rolling hills, as well as some rock bluffs in an attempt to capture some of the geographic essence of Niagara Escarpment region. Depending in whether or not the landforms were being stacked atop the hidden tracks or not, I either built the hills as solid masses of Styrofoam, or used small blocks to created elevated areas with open cavities beneath (for inevitable later access).

I opted to use the half-inch think pink foam for all of the construction, and I found many benefits to having selected this thickness of the other available sizes. Firstly, cutting the foam is a snap ‘ literally. You simply need to score the foam about ½ inch deep with a sharp knife and bend it along the cut and it will snap clean. Likewise, after hearing about all of the dust crated from slashing away at the foam with an old steak knife of rasp, I bought a package of utility knives; the ones that have the thin blades that you can extend about 3 inches. These knives easily cut through the foam cleanly. I was able to shave the majority of landforms smooth just using the knife. (Buy a pack of blades ‘ they do tend to dull quickly.)

I used PL300 adhesive to join the foam, and I shoved in 1 inch finishing nails to keep things in place while it dried. As I worked, I installed the backdrop/view block, fastening it in place with hot glue and wood scraps. I didn’t make the backdrop overly high, as I envision this model railroad being shoved behind the furnace etc. for storage, so the shorter the overall height, the better. After two casual evening of work, I had all of the terrain roughed in.

scenery11.jpg

scenery2.jpg

scenery3.jpg

After considering the different bridge types that I could use for the overpass, I decided that a generic concrete structure would best suit the era and region I was attempting to model. I was certain that I could probably build the overpass out of extruded Styrofoam; the challenge was that the upper track crossed the lower at about a 30 degree angle which meant the tunnel would have to be cut through the overpass at the same angle.

Here’s my solution:

bridge1.jpg

Using a scrap piece of Styrofoam, I eyeballed an appropriate height for the tunnel. As the clearance between the upper and lower track was minimal, I wanted to keep the tunnel portal as small as possible in order to make the overpass look beefier.

bridge2.jpg

Satisfied with the dimensions of the opening, I rounded the top of the opening to create a simple arch. Happy with the shape, I sanded the edges smooth with an emery file, to create a master template.

brdige3.jpg

I copied the template, gluing each successive later atop one another with some PL300 adhesive, until the overpass was 4″ thick.

brdige41.jpg

Once the glue had completely dried, I measured the angle that the upper track intersected with the lower track, and created a cutting guide based on this intersection. Using a fine-tooth cross-cut saw, I sawed off the excess foam around the guide, ensuring that each cut was perpendicular to each other and as vertical as possible.

bridge5.jpg

I adjusted the length of the overpass until it fit snugly between the risers.

bridge6.jpg

I added guardrails by gluing and pinning small strips of foam to the top of the overpass.

bridge7.jpg

Once dry, I applied a thin coat of drywall mud to fill all of the gaps, sanding the entire structure smooth once the mud had completely dried.

bridge8.jpg

I applied a coat of concrete coloured paint, lightly ballasted the track, installed the overpass, and completed the remaining track work.

Having endured the agony of building my own turnouts for the now defunct UUR (Unfinished & Undecided Railway), I was looking forward to actually laying down some prefab rail and turnouts. In order to accommodate the small size of the EAS, track work was designed around PECO #4 turnouts ‘ their small radius and curved points allow for tighter track arrangements. The other reason I chose PECO turnouts was that I already had a small number on hand, the result of a false start several years ago. The track is all ATLAS Code 80 flextrack; the only track my local (and sparsely stocked) hobby shop carried.

I tried a new technique for laying the track that I had read about, which involved spreading a thin layer of caulking on the roadbed as an adhesive. I would highly recommend this method to anyone, as it was the easiest and slickest technique I’ve ever used.

Working in two foot section, I applied a small bead of caulking down the centerline of the roadbed, and then spread the bead into a paint-thin coating with my finger. Next, I simply pressed the track into the caulking and where necessary, added a pushpin to secure the rails until the caulking had dried. The slick part about this technique was that as I laid the rails around curves, the caulking actually held the track in place without the push pins. As such, it was possible the bend the track in a nice even curve, and then push it into the caulking to hold it in place. I still elected to add the push pins.

Along the way, I discovered a few important things:

  • Don’t apply too thick a layer of caulking as it will squeeze up between the ties and cause problems when you ballast.
  • Wiggling the track back and forth excessively while attempting to position it in the caulking will again force it up between the ties.
  • Don’t apply any caulking beneath the point on turnouts.

I also took the opportunity to install a couple of uncoupling magnets, for when I actually getting around to installing magnetic couplers on my fleet of cars. I purchased some ceramic magnets at Radio Shack, which appeared to be the same thickness as the roadbed, as well as the same width. The magnets were a little thick, so I shaved down the plywood about 1/16 of and inch under each magnet, so that once installed they were level with the top of the roadbed.

I opted to leave the track hanging over the overpass as I haven’t decided what type of bridge/tunnel configuration I’m going to use!

track2.jpg

track1.jpg

track3.jpg

I am currently in the process of updating the site – adding a bunch of new content, and attempting to organize information in a logical fashion. During this time, don’t be surprised if things break, are missing etc. Bear with me!

Thanks!