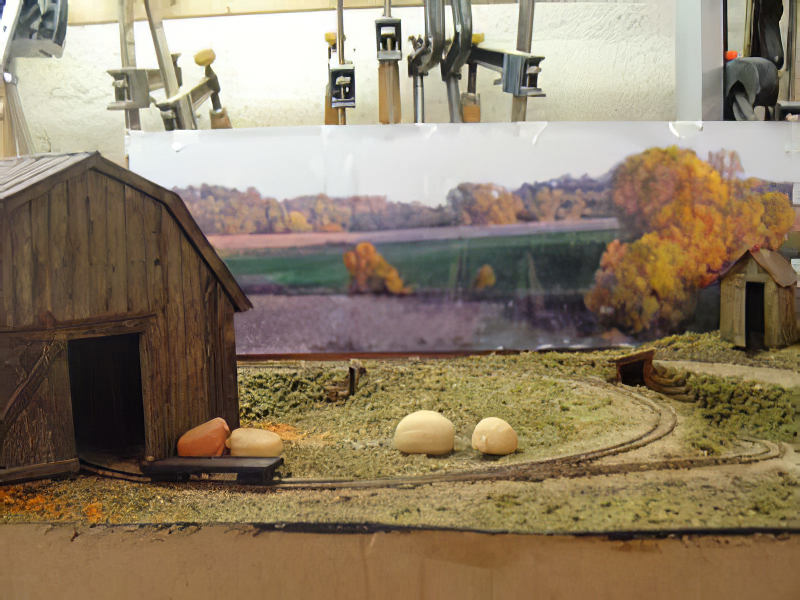
September 2007


With the groundcover in place it was obvious that before I could precede any further I would need to install the backdrop ‘ as I couldn’t add scrub brush and trees without it. I had every intention of painting the backdrop, but as I was surfing the web for reference images it dawned on me that I might be able to print a suitable backdrop ‘ which would save me a great deal of time and effort!

I found a very nice image of rolling farm fields with a smattering of autumn trees that looked like a good fit for Pete’s Pumpkins; however the image was far too small to create a decent print. Rather then search for a higher resolution image, I elected to apply a few Photoshop filers to the image to give it a more ‘painterly’ look. The end result wasn’t sharp, but suggested the scene very suitably. After trimming the printout and eyeing the results, I decided that while the backdrop helped the model immensely ‘the colour wasn’t right. I discarded the print, resolving to correct the colours to more closely match the foreground scenery.

While I’ve been working on the layout I’ve been trying to decide how to justify the existence of a narrow gauge railway on a pumpkin farm. I decided that the only reason a pumpkin farmer would need a railway would be because either he has a high volume of goods to transport, or the goods are quite heavy. It seemed unlikely that a farmer would use a railway to transport pumpkins when a tractor and wagon would suffice ‘ however ‘ it seemed reasonable to presume that if the pumpkins were large, too large to load onto a wagon, that a farmer might use a railway. Hence, I’ve decided that Pete of Pete’s Pumpkins specializes in growing competition-grade monster pumpkins.

With the industry of the model railway finally decided upon, I set to work in creating a flatcar and some pumpkins for Pete. I shortened the underside of an old N scale boxcar, and glued on a new deck I built using some bits of styrene. I gave the flatcar a quick coat of flat-black spray paint, as well as some red oxide and dark brown.

I next modeled some ‘monster’ pumpkins. Using the leftover Sculpy I managed to model four very large pumpkins. Monster pumpkins aren’t the typical pumpkin shape ‘ they look like they’ve collapsed under their own weight and have a pancake-like look. The models I created represent competition-grade pumpkins with an approximate weight of 350-500lbs each ‘ which now makes having a railway much more plausible!

Kim “Grizzz” Little of WHR fame, has been good enough to share his collection of images with me. With hundreds of images to choose from, I’ve decided to focus primarily on the Windsor Yard. I was particularly pleased to find a few images of WHR’s GMD1 #1423, as well as the photos that tie the yard office to the maintenance shed.

Thanks Grizzz!

n709818372_172625_8663.jpgn709818372_174852_5047.jpgn709818372_174887_3148.jpgn709818372_176639_2879.jpgn709818372_176640_3102.jpgn709818372_178542_4706.jpgn709818372_179894_3472.jpgn709818372_167156_5651.jpgn709818372_170768_8879.jpgn709818372_170776_938.jpgn709818372_170777_1190.jpgn709818372_170789_4305.jpgn709818372_172624_8345.jpgn709818372_118289_7967.jpgn709818372_162070_6663.jpgn709818372_162565_4909.jpgn709818372_163658_10.jpgn709818372_163664_1460.jpgn709818372_166850_423.jpgn709818372_166857_2302.jpgn709818372_118270_2490.jpgn709818372_118277_4484.jpgn709818372_118269_2180.jpgn709818372_118279_5056.jpg

A busy week has kept me from making any progress on the layout ‘ so when I did manage to steal away a few hours, I decided to maximize the time. I wanted to start scenicing the layout, so I decided to add the groundcover and ballast the track together to save time. I applied a coat of full-strength white glue to the hills, banks and roadbed sides before sifting on combinations of dirt, blended leaves, ground foam, twigs, rocks and ballast. When I was satisfied with the results, I misted the entire layout with water and applied diluted white glue. Hopefully everything will be dry by tomorrow!

A few nights of scoring, bending, painting a gluing have paid off, and I think I can say the barn is done. Working in N scale sure spoils you when it comes to the quantities of materials needed! This structure was a pig!

I built the barn door using some bits of rail, the wheels off an old N scale boxcar and some scrap styrene. The door can slide along the rail so I can open or close the door depending on my mood.

I’m pleased with the barn, although it would certainly fail close scrutiny. Then again, this is a ‘fun’ layout that I’m building just for the experience, so I’m not too worried about its accuracy. I’m likely not going to super-detail it, however knowing myself fairly well, I will likely add things over the next few weeks in the moments where I procrastinate from building trees!

(Excuse the shine on the roof of the barn ‘ the dullcote hasn’t dried yet)

In my never-ending quest to find more information about the WHR, I happened upon a few videos on YouTube. It never ceases to amaze me what you can find when you look hard enough. As well, I met some great people on the nScale.net message board who have offered to assist me in my research. Thanks to all!

One of the challenges I’m facing designing the WHRC is locating a blueprint of the track arrangement. I assumed that Google Maps would have had suitable reference images, but I discovered that the satellite images of Nova Scotia were quite poor ‘ the highways are barely visible, let alone the rail lines. So I reviewed the small compliment of images available on the web and tried to piece together what I could. The challenge was that the vast majority of images have been taken by railfans, therefore they tend to focus on the locomotives, and not the surroundings.

The first suitable image I found was a shot of WHRC shops in Windsor ‘ a perfect subject for a small pike. The track layout is clearly visible, and the engine shed and sidings would fit perfectly on a narrow shelf. As well, the elevated highway could sit against a backdrop and serve as a view block.

whrc-shop.jpg
Copyright Kim “Grizzz” Little / http://yardlimit.railfan.net

I compared this image with a set of images I found on ns1763.ca, taken from a bridge that crosses over the east/west bound tracks near the WHRC shops, and decided that west of the bridge is the WHRC company office.

whr-minas-15002.jpgwhr-minas-15005.jpgwhr-minas-15006.jpg

Copyright Ivan Smith / http://www.ns1763.ca

Based on this information, I came up with the following track diagram that could easily be used as a blueprint for a small shelf layout. Operationally, I believe this plan has a lot to offer ‘ particularly if the east and west tracks terminated at a transfer table or sector plate. The only drawback to the schematic is that the engine shed and the company office are in the foreground, which would foul the access to the turnouts. One option would be to flip the tracks so that the structures were on the North side of the layout, or to model the layout from North ‘ which would put the highway in the foreground and reverse east and west. Now I need to discover where the two spurs diverging south from the yard travel to.

whrc_blueprint.gif

whrclogo1.jpgThe Windsor and Hantsport Railway is a 56 mile railway operating in Nova Scotia, Canada between Windsor Junction and New Minas with a spur at Windsor serving two gypsum quarries at Wentworth Creek and Mantua. The WHRC’s primary commodities include gypsum, rock, grain, vegetable oil and lumber. The majority of WHRC traffic originates at the two gypsum quarries on the spur running east of Windsor, whereby the gypsum is hauled by unit trains to the port at Hantsport. The WHRC offered a seasonal tourist excursion train, the Evangeline Express, offering passenger service between Windsor and Wolfville.

Formerly owned by Canadian Pacific Railway, the mainline and spurs were sold to Iron Road Railways and officially started operations as the WHRC in August 1994. At the time of purchase, WHRC acquired a small fleet of Alco/MLW RS23 units from CP, which until 2005 were the primary motive power for the railway.

I first encountered the WHR a few years ago while visiting family in Nova Scotia. I distinctly remember driving down the highway alongside a pair of ALCOs pulling hoppers filled with gypsum – spitting black smoke into the air as they laboured along the rails. I was smitten with the railroad and spent the evening researching it. There were only a few resources available online, but it was enough to learn the railway’s general history, the customers they served, and their locomotive roster.

Until recently I had forgotten about the WHR, as my interests had turned to the Ontario Southland Railway, and their Guelph Junction Railway operations. In researching the OSR, I found many references to WHR’s fleet of RS23′s ‘ as both the OSR and the WHR had several of these engines, and my interest was rekindled.

As such, I am planning to build a small layout based on the WHR ‘ likely focusing on their Windsor yard operations. This shortline is a perfect candidate for modeling as their limited industries etc. allow for reasonable selective compression. On the other hand, I have struggled to find decent information online, as the small compliments of sites that refer to the WHR are generally railfan sites ‘ which are a great references for locos of the WHR, but offer very little information about yard configurations, trackside structures etc. Likewise, Google Maps doesn’t have images that are a high enough resolution to be of use.

As such, I will attempt to design a layout based on what I can find. I hoping to secure the rights to feature some of the photos other sites are currently hosting, as well a feature a small compliment of videos I’ve come across. If anyone has any information that I might be able to use, I would certainly appreciate speaking with you!

I spent the evening sheathing the barn. In a few short hours I managed to install most of the barn boards atop the foamcore base ‘ less the fact I ran out of boards! Because the boards are cardboard, they tended to curl once installed, some more then others, which gave a nice effect. Anytime a board started to curl too much, I simply dabbed a little hot glue on the underside and stuck it in place.

Eager to see how things would look, I have the entire structure a quick weathering before replacing it on the layout. I first spooned dirt onto each of the walls, and brushed it away using a makeup brush. When I was happy with the effect, I sprayed the dirt with dullcote to set it in place. I next sprinkled some fine ‘earth’ ground foam onto the wet dullcote near the base of the structure, followed by a very light dusting of light green. The effect is that of a damp, mossy barn.

There are a few major details I need to add ‘ namely the doors, and the roof, however at this point I’m happy with the results for the effort.

I’ve decided to import my posts from Pete’s Pumpkins to this site – to keep and archive of the blogger work and gather my modeling efforts in one place. I will keep the other site updated regularly, and this site will update every day or so after that. As soon as I’m done this micro layout, I’ll get back to work on the NES.

Thanks.

With the barn structure built I was ready to start adding the siding and roofing. I had figured out how I wanted to model each, but having never tested either technique I thought it best to create a ‘test’ piece. As I wanted to add a structure to the right side of the layout, I decided to model an outhouse to try out my ideas.

In the end I was very happy with the results, and I am ready to start sheeting the barn!

Building the Outhouse

I built the privy in the same manner I made the barn ‘ hot gluing foamcore to create the basic structure, and adding a flap of cardboard from a cereal box as a door.

Modeling Barn Boards

I first covered a piece of cardboard with a mixture of tan and gray paint ‘ rather then mix the two colours consistently, I opted to leave them as mottled a possible to give the card some colour variation. I sprinkled some fine ballast onto the wet paint ‘ ballast colour wasn’t important as I was going to use this as an abrasive. I then dragged a scrap piece of foamcore across the surface of the card (in a uniform direction) until I had removed the majority of the ballast, and the surface of the card had numerous vertical scratches. Once dry, I rubbed off the remaining ballast with my fingers and applied a light misting of black spray paint to add some small black flecks. Again, I waited for the paint to dry and applied a thin blotchy wash of burnt umber oil paint and varsol to the surface of the card. I cut the card into scale boards, and mixed them up ‘ reversing some of the boards end for end in an attempt to hide all seams. I painted the privy flat-black and attached the boards one at a time with white glue ‘ making sure to leave a small gap between each board. Once the glue had dried, I weathered the structure with some real dirt, applied some Testor’s Dullcote, and dusted on some fine green ground foam to represent moss.

Modeling Corrugated Steel Roofing

I cut some heavy tinfoil into scale siding pieces approximately 2×8 feet in size. I laid the foil on a soft piece of pine, and placed a large bolt atop the foil at one end. Using a piece of hardwood as a pressure block, I pushed down firmly on the bolt with the block of wood, and rolled the bolt along the length of the foil. The threads of the bolt dented both the foil and the wood, creating the characteristic corrugated pattern. I sprayed the individual roofing pieces with black/brown/red oxide spray paint to create a dull weathered look. Once the paint was dry to the touch, I dragged a rag along the surface of the foil, and removed some of the paint ‘ exposing the foil beneath. I hot glued the sheeting to the roof, and applied alternating coats of dirt and dullcote for weathering.