November 2007
Monthly Archive
Thu 22 Nov 2007
Posted by Model Railroader under
'Short-lines'[5] Comments
From time to time I am reminded that the North American model railroad press and their modelers can be quite insular – we seem to have a set number of approaches, techniques and products that we habitually use, as well as a basic modeling ‘standard’ that we try to achieve. Like most modelers I have been working happily within this ‘standard’ and generally gauge the quality of my work by comparing it to the work of others. That being said, there are moments when the work of another individual changes my notions of modeling success, as these modelers produce work that is unique, impressive and inspiring. Josepf Brandl is one of those modelers.
I’m not quite sure how I discovered Brandl’s work – he has had a few articles published in Model Railroader – and I’ve seen his name mentioned occasionally in the depths of some European railroad forums – but he was virtually unknown to me. It was by complete chance that I stumbled across his book Almost Real / Fast Wie Echt, while searching amazon.co.uk for model railroading related materials. I ordered the book on a whim and I can say that is has drastically changed my perspective on the hobby.
The book is coffee-table style, having a minimal amount of text (in both German and English) and countless pages of full colour images. The book doesn’t focus on modeling (although it does mention a few techniques) as it elects to summarize the particulars of 6+ layouts, while outlining a brief biography on Brandl.

The lack of ‘how-to’ information seems unimportant once you start looking at the images, as its not just the modeling techniques that make Brandl’s layouts so impressive, it’s his approach. Rather then modeling cramped industry-heavy urban scenes, the majority of Brandl’s work focuses on modeling great sprawls of countryside. Subscribing to the theory that ‘less is more’, Brandl allots an immense portion of each layout’s footprint to scenery – keeping the railroad aspect of each layout to a minimum. This ratio of scenery to track is what distinguishes his work from all other work I’ve seen and makes it so effective. Trains weave through valleys, span rivers, climb mountains and move through tunnels realistically as vast amount of natural scenery creates plausible and lifelike landscapes.
This ‘landscape-first’ approach is what makes Brandl’s work so distinct. Most of layouts I see in the North American press seem to place an inordinate amount of importance on operations, or prototypically detailed motive power etc., but never on creating natural environments. Many of the articles regarding scenery don’t focus on how to create realistic results, but how to create the most ‘acceptable’ results in the least amount of time. We tend to favour scenically homogeneous, track-heavy layouts that can support a multitude of operators, and claim prototypical accuracy – but are set in unrealistic landscapes that undermined all ambitions of realism and foster a ‘toy-like’ perception that is too often associated with the hobby.
I earnestly recommend this book as it offers a welcome glimpse as to what a model railroad could be in light of what we are used to. I know that as I consider future projects the contents of this book will definitely influence my decisions.
You can download a free copy of one of the chapters here: http://www.einsatz-verlag.de/
Thu 15 Nov 2007
Posted by Model Railroader under
Structures[3] Comments
Weathering is a facet of model railroading that I have never really explored. My only experience with weathering was over-spraying a water tower with white paint when I was 12. I have read many articles on weathering published in the MR press, and browsed countless websites and forums researching the topic. This research has revealed that there is many ways to apply weathering, and there is no ‘right’ way; simply a multitude of different techniques that are employed because they are the preferred method of each individual modeler who has learned to control the results of their unique process, and are comfortable working with a method that produces predictable outcome. I also discovered that weathering is a hobby within a hobby. The same way that there are modelers who focus their attention on operations, prototype modeling, rolling stock, structures etc., there are modelers who enjoy super-detailing and weathering buildings.
I’m not one of those people.
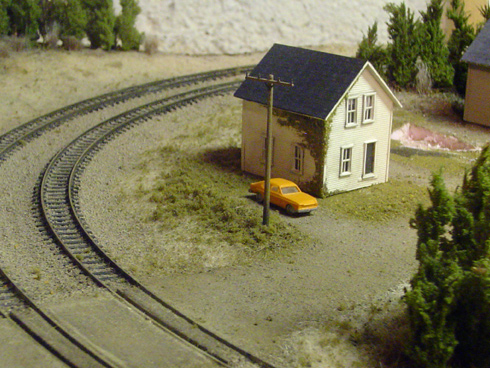
My preference is scenery construction and I consider structures part of the overall layout – not models within a model. Therefore, I simply wanted to find a way to kill the shine, dull the colour, and allow my structures to blend into their surroundings. The answer was in a simple India ink / alcohol wash.
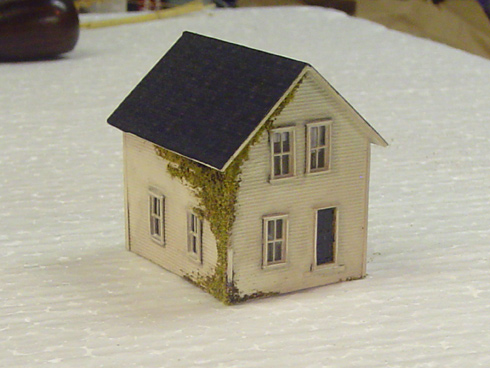
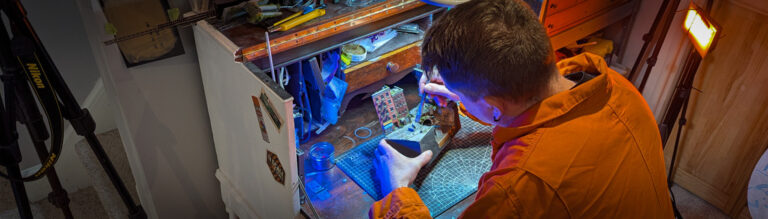
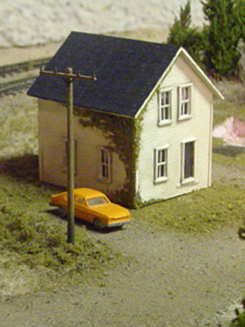
I mixed 6 drops of India ink with 1/2 cup of rubbing alcohol to create a dirty wash, and using a soft brush, I applied an even coat of the wash to the entire structure. I found that in places the wash seemed to be ‘resisted’ by an oily residue – perhaps from a fingerprint. In those spots I scrubbed the spot with the paintbrush and the spot disappeared. As the structure began to dry, it became apparent that the wash was too strong, and as it was starting to pick out the flaws as well as the details. Using a cotton swab, I gently wiped away the majority of the ink, and soaked up as much wash as possible from the imperfections. The entire process only took a few minutes, and when I was finished the structure had a dulled, dirty appearance that I was happy with.
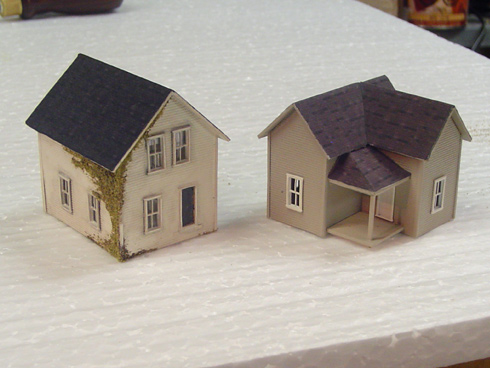
I wasn’t happy with how pronounced one of the corner seams was, so as soon as the wash was dry I dabbed some white glue onto the seam and the area below the soffits and sprinkled on some ground foam to create ivy. While the glue was drying I divided my time between adding some more paper shingles to another one of the structure as well as cutting some acetate sheets and bond paper to create window glazing and blinds. Once the ivy had dried I glued the acetate to the inside of the walls, as well as the blinds, and gave the entire structure a final misting of matte spray.
Overall I’m quite happy with the building and the weathering effect. The structure itself is very simple, and has its flaws, but it does the job and at a glance blends into the layout nicely. Only four more houses to go!


Wed 14 Nov 2007
Posted by Model Railroader under
Pete's PumpkinsNo Comments
I spent some time and compiled a small gallery of images that document progress of the Pete’s Pumpkins model railroad over the course of the last two months. Before I started this project, I doubted that it was possible to build a model railroad in such a short time ‘ however having completed this railroad in 9 weeks has left me happily enlightened.
The project was a great learning experience, and I believe it highlights some of the winning characteristics of constructing a micro/small model railroad. First, space is easy to come-by as any model railroad two square feet of less can be easily stored and transported ‘ which in my case allowed me to casually work while surrounded by my family. Second, the small size lets you experience all the aspects of model construction in much shorter time frame. This lets the builder sample each phase of model building and gain an appreciation for the challenges each area presents. Likewise, it lets the builder learn what they have a natural affinity for ‘ be it scenery or motive power ‘ which might help to shape the choices they make on future projects. Third, the inherently ‘absurd’ nature of a micro/small model railroad lets the builder take creative liberties and create a fictional pike that isn’t bound by prototypical rigor. The builder can experiment, take chances, and ‘imagineer’ as they wish as there’s no real-life example to keep them accountable. This freedom ultimately shapes my fourth point; micro layouts are fun! Despite my limited experiences, I can honestly say that I have enjoyed building Pete’s Pumpkins as much as any other project I’ve tackled. I’ve learned a great deal over the last two months and I’m eager to apply these new found skills on other projects.
So what’s next?
Pete’s Pumpkins will likely go into storage, although I am considering retrofitting his pumpkin industry with firewood (the pumpkin market just isn’t as lucrative as one might think!)


Wed 7 Nov 2007
Posted by Model Railroader under
Structures[2] Comments
I spent some time this evening applying my printed shingles to two other houses in an effort to better my attempts a few evenings ago. Rather then print new images with higher contrast in hopes of offsetting the ‘clouding’ effect of the testor’s dullcote, I opted to search out a different matt sealer. During my time in art school, we often sealed our charcoal drawings with a ‘fix’ spray, so I picked up a can from the local art store and decided to give it a try. Without a doubt, the results are far superior. While the spray does go on quite heavy – requiring you to spray from a distance – it provided a matte finish that is totally transparent. I’m not sure how durable the finish is, but it looks good. As well, the cost is much lower then dullcote – a large can cost less then $10.
Here’s a quick photo of the results – granted, it’s difficult to see the individual shingles in the image, but the results are pretty good.


Mon 5 Nov 2007
Posted by Model Railroader under
StructuresNo Comments
Having built the majority of the structures for the NES I realized that I still hadn’t figured out how to address the roofs. I wanted to shingle the roofs with regular asphalt shingles, but I was struggling to find a suitable tutorial on how to do so – most modelers seeming to prefer tarpaper roofs to shingles – tarpaper being easier to model prototypically as individual asphalt shingles are microscopically small. I found that there were laser cut shingles available from different manufacturers but their cost was higher then I was willing to pay. I decided that I would attempt to create printed shingles and see how they looked. I found a number of shingle textures online (textures are the term for images which are geared for use in 3d) and created a seamless tile of shingles in various colours, including a ridge cap. I printed the shingles on sheets of premium coated bond paper and set to work carefully cutting and attaching the sheets to the roofs of two of my structures – the signal tower and one of the houses. I first applied a coat of dark gray paint to the roof to server as an adhesive, and then carefully pressed the paper shingles into the still-wet paint. I trimmed the excess paper, and carefully blacked-out the white paper edge with a pencil. I was really pleased with the result; the roofs had a convincing shingle pattern! There were a few spots where some of the paint had seeped out under the edges of the paper and created small ‘shiny’ spots – resembling large swaths of tar. I decided to spray each of the structures with some dullcote, and disaster struck. The dullcote dulled the paper and added a chalky film that completely obscured the shingle pattern, leaving only a light gray roof. I was tempted to pitch the houses into the garbage in frustration; however the light gray roofs were not unconvincing as they seem to be realistically weathered. I’ve decided that I would keep the structures and will try again. My options at this point are either to create shingle print-outs that have unrealistic contrast, in hopes of offsetting the dulling qualities of the spray, or to apply the shingles and not seal them. The latter may cause problems when it comes time to apply weathering, as I will either have to apply the roofs as the very last step, or mask the roofs to avoid changing the colour.
.
On the bright side, the dullcote on paper did create a rather realistic and instant weathering effect that might work well in other applications! Stay tuned!
.
