January 2008


wgr.jpg
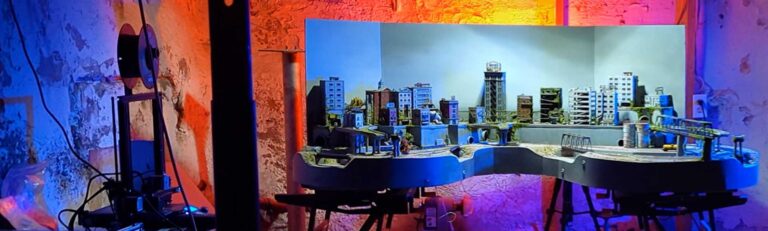
I’ve completed the WGR bench work, and having spent the last few days staring at it I’ve concluded that I’m not happy…

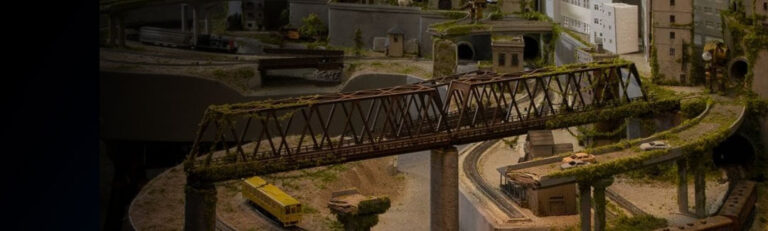
I was pleased with the design when I conceived it, and I’ve had an opportunity to think about it for a few months and in that time found little fault – always bearing in mind that this was a small layout, and with that came trade offs. Despite this, the one aspect I couldn’t visualize was the grades, as well as the volume of hidden track. Now having had an opportunity to take a better look at things I realise that both are a bigger trade-off then I imagined. Hence, I’m starting over…

So what’s next?

The baseboard is still good and I can ‘easily’ remove the risers, and the track and turnouts I’ve ordered can be repurposed. The only issue at this point is re-evaluating how I want to go about representing the WHR prototype. Despite best efforts I don’t think it’s possible to capture both the essence of the region as well as operations in a small space.

The more I consider it, the more I’m leaning towards doing a single element of the WHR – such as the Windsor Yard. I would like things to be continuous run – so I’ll need to give this some thought! Stay tuned!

foamsmall.jpgAfter having spent some time building the NES, looking at other layouts, and reading about construction techniques, I was convinced that it was possible to build a layout that was almost completely made of foam. Conventional wisdom dictates that layouts be built to museum quality standard ‘ with heavy duty wood construction ‘ but often times that is a necessity of building a layout that is, well, heavy duty. I decided that if I were to attempt to build the WGR using foam exclusively, such construction techniques would be unnecessary as the layout itself wasn’t heavy duty.

A trip to the local DIY store offered a rather sobering perspective on foam, as extruded foam ‘ the modelers foam of choice ‘ was also quite pricey, costing well over $ 25.00 for each 2″ thick 2′x8′ sheet. Needing three sheets of foam for the project, I considered scrapping the whole foam idea in favour of plywood as its cost would be a 1/3rd that of the extruded foam. Just as I was about to commit to some ¼” birch plywood, I noticed a new foam product called Plastispan HD expanded foam. Apparently this newer product is considered mid-grade ‘ better then the standard white foam, but not quite as good as the extruded pink/blue stuff. It is considerably harder then the white bead foam, and much less crumbly. I threw caution to the wind and decided to give it a shot.

The WGR is 34″x72″, which would have fit on a door, but wanting to stick to my foam commitment, I decided to construct the baseboard out of 1″x2″ pine with support stringers every 16″. I glued and nailed a simple frame together and then attached the sheets of foam using PL300 adhesive, and let the entire assembly dry for a few days.

Once dry, I started transferring the trackplan onto the baseboard. Using a stick for a compass, and some photocopies of turnouts, I marked, traced and plotted the basic track arrangement. I wasn’t surprised to find that despite best intentions, the trackplan wasn’t going to be a perfect fit, as my turnouts needed more space then estimated. By reversing the turnout arrangement on one section of the wye, and eliminating one of the hidden staging tracks I was able to make everything fit.

For risers, I opted to use foam ‘ I’ve been looking at the Woodland Scenics foam risers and deiced that it would be straightforward to construct something similar ‘ the advantage being that the cost would be greatly reduced, and I would be able to create custom grades. To make the risers, I measured the length of the curve/strait section of track I was working on and transferred the length on to the foam. I then marked the heights that the grade needed to rise over that distance on the foam, and cut the foam into a large wedge. I scored and snapped the foam every inch or so and glued the riser segments to the baseboard ensuring the inside edge was butted tight against one another. Work went quickly, and in the course of three hours I managed to construct all of the risers seen here.

My mind is already buzzing trying to figure out how to scenic all of these grades. Many will be hidden, but other will need some creative camouflage is order to maintain some believability. That being said, the foam experience thus far has been very positive! Looking forward to the next stages!

foam-001.jpg

foam-002.jpg

foam-003.jpg

foam-004.jpg

foam-005.jpg

foam-006.jpg

foam-007.jpg

wgr.jpg(Originally posted on nscale.net)

I’ve been fortunate enough to have spent the past year working on my Niagara Escarpment System – as small freelanced 2×4 layout set in south western Ontario. In this time I’ve learned a great deal building this, my first layout, and now better understand what I’m interested in, what my goals are, and what my next steps should be. I promised myself that I would ‘finish’ the NES, and I’ve done that. The layout isn’t done by many standards, but as whole it’s been completely sceniced, runs well, and has sated most of my desires. Now on to (slightly) bigger and better things.

The WGR will be loosely based on the Windsor Hantsport Railway, a 56 mile railway operating in Nova Scotia, Canada between Windsor Junction and New Minas with a spur at Windsor serving two gypsum quarries at Wentworth Creek and Mantua. The WHR’s primary commodities include gypsum, rock, grain, vegetable oil and lumber. The majority of WHR traffic originates at the two gypsum quarries on the spur running east of Windsor, whereby the gypsum is hauled by unit trains to the port at Hantsport. I was smitten with this railway while visiting family in Nova Scotia and as it is a fairly small operation, it lends itself well to my desires.

Over the course of the last few months I’ve been able to develop a trackplan that should lend itself to my current needs, and while by no means a realistic condensation of this prototype, I believe it effectively captures many of the features indicative of the shortline, embodying the essence of the railway as a whole.

With that, I’ve set out a modest set of goals which I aspire to obtain. Some remedial, others more involved. For the most part all of these guidelines have been set in an effort to become a better modeler, and to broaden my scope of the hobby.

Benchwork

I have every intention of building 95% of this layout using extruded foam – benchwork included. With the exception of support stringers my hopes are to demonstrate that a excellent base can be constructed almost entirely of the pink stuff. I like woodworking, I have lots of tools, but I think that some stray away from constructing ‘custom’ baseboards as the woodworking component is too daunting. I think this tends to limit modelers to settle with doors, sheets of plywood or DIY shelving for their base, and I’d be happy to prove that a anything is possible with the right materials. (Let’s see if this one comes back to haunt me!)

Track

I’m excited about trying Atlas’ code 55 series, and I’ve already placed my order. The NES used the standard code 80 track common at most hobby shops as well as some Peco switches I had on hand. I’ve been happy with the results of these items, and wouldn’t want to discourage anyone from using them, but I’m now ready to try something finer. As well, my trackside scenery treatments were a little cavalier on the NES – I picked a ballast colour I liked and went with it. However, looking down the lines of all the railway crossings in my local area, I’m starting to appreciate that modeling track is like anything else and is aided by reference the real thing.

Scenery

I’m not a rivet counter, but I would like to become more of a ‘daisy counter’. Scenery is the most enjoyable aspect of this hobby for me, and I’d like to improve upon the results of the NES. I’ve spent a good deal of time looking over the work of modelers such Pelle Soeberg and Josef Brandl, and once of the most striking differences I’ve noted is how they accurately model the things that aren’t trains. Proper elevations on roads, believable lot sizes for residential areas, drainage etc. – details that I considered only as an afterthought. Likewise, I need to teach myself to look at scenery ‘prototypes’ more, be that my backyard, or aerial photos of different railways. I’ve got a good deal of art school training under my belt and one of the first things you learn is that you need to ‘look and see’. I’ve ignored this advice and have been happy to work from memory – a memory that remembers things as a whole, not the details. What colour was the ballast? What shape is a maple tree? A few moments of reference for these and other questions will undoubtedly improve my modeling efforts.

Structures

Scratchbuilding is a wonderful hobby within a hobby, and I’m quite taken by it. Every structure on the WGR will be scratchbuilt – I enjoy the practice and it allows me to enjoy the hobby with but a small toolbox and the kitchen table – a nice reprieve from the basement dwelling that is too often the life of a modeler.

Motive Power and rolling stock

I optimistic that this endeavor will allow me to casually learn more about the subject of all layouts – trains! I’m admittedly ignorant with all things on wheels and I think basic investigations about the engines and cars of the WHR will help expand a very narrow knowledge base. I’m not looking to get a degree in engines, but just a better understanding of the history and uses of motive power. Likewise, I’m working up the nerve to scratchbuild an RS23 – the past engine of choice on the WHR. I’d also like to actually try detailing some equipment, weathering it at the very least!

Overall

I’d like this next project to be a sum of its parts. I’d like to create a pike that is effective overall. If a casual survey of the pike is pleasing then the project has been successful. I dislike sore thumbs, and they catch my eye all the time. I’m striving for unity – a homogeneous relationship between all elements that make up a railroad. If close inspection finds a flaw, that’s okay – it’s the first impression I’m interested in – besides, if I take the time to ensure that the railroad works as a whole, I will be satisfied.

So what of the NES? I still have one little lighting project I’d like to attempt, and then I will wrap the entire thing in plastic and store it safely. I have no intention on cannibalizing the layout, as I want to start new. I also have no intention of trashing the layout as I’ve invested a good deal of time in it and I want to keep it until the next project comes along.

So there we have it, a rather long winded introduction to the WGR – now that it’s in print and public I have no choice but to stick by my words… Oh mercy…

I managed to purchase some bench work supplies this week to start the new layout (introduction forthcoming) which means that I’m now committed to my Windsor Gypsum Railway Co., I can officially cease all work on the NES. The NES hasn’t had a lot of run time – the majority of my efforts have been spent learning about scratchbuilding and developing scenery techniques. As such, it seemed only fair that I run a few trains ’round the loop and shoot a few photos for prosperity. So here you have it – the final run of the NES. Thanks for the ride.

fallenflag8.jpg

fallenflag5.jpg

fallenflag6.jpg

fallenflag7.jpg

fallenflag4.jpg

fallenflag1.jpg

fallenflag2.jpg

fallenflag3.jpg

trackplantools.jpgI’ve spent some time over the last few years surveying a number of different software solutions intended to help users design their model railroad – most recently trying Altas’ RTS. Each of the programs I’ve tried have offered a fairly comprehensive set of tools, and allowed users to draw simple track plans. Beyond that scope, most of the programs tend to get far too complicated – at least for casual use. It strikes me that despite best efforts, designs never quite work in practice, and serves the users best as guides rather then blueprints. As such, I’ve will continue to rely on Adobe Illustrator as my program of choice.

As I iterated here, Illustrator is not a program that many people use – at least not in relation to its big brother Photoshop, and it is geared to the graphic design industry, not CAD. That being said, I have found that it’s easy to lay out basic radii and switches and get a sense of what will fit in a space using the program, and to use these drafts as a guides, as ‘real’ track planning is done on the baseboard.

With that, I did happen across a fairly useful little plug-in for Illustrator intended to help users draw track plans. Developed by Rick Johnson (senior illustrator at Model Railroader Magazine), this plug-in helps draw switches, crossovers, basic curves, strait track sections and stubs. Elegant, simple, and fairly comprehensive (you can specify the turnout size by simple holding the turnout number down while clicking) this inexpensive plug-in works well, and removes a great deal of headache.

Rick offers the plug-in as a shareware release with a limit of 100 uses before he requires the user to pay $15 to register. The 100 uses is more then enough for any user to adequacy try the tool, and the $15, well, money well spent!

http://rj-graffix.com/software/plugins.html

mill2small.jpgAs noted in the previous post, the feed mill looked too desolate for my liking so I set out to add a small side structure. Working from the basic dimensions of the mill I constructed a simple office building – ensuring that I matched the roof pitch and basic form of the mill to ensure continuity. In two evenings I was able to complete the project (this scratch building stuff is getting easier!) and install it on the layout.

The suggestion was put forth that I attempt to reduce the thickness of the sandpaper by sanding the backing off of the paper in an attempt to make it thinner. The problem was the only sandpaper I had on hand was the 320 grit I was using to for the shingles themselves – after a minute of sanding I had barely removed the text on the backing paper so I cut my losses and quit (an experiment to follow up on later!). Despite this, the results were much better this time as I used CA to attach the shingles rather then white glue, and I was able to pinch the seams down tight against the building – improving the appearance dramatically. (I had used white glue for the other shingles so that if I was unhappy with the results I could remove the sandpaper and glue with just a bit of water.) I airbrushed the tarpaper roof and weathered the building, frosting the inside of the windows with a bit of paint to suggest dust.

I added the ‘Balinifad Feed’ sign to the office for a bit of colour, and to help reinforce the fact that this industry was not yet defunct. The sign was designed on the computer and printed to scale. I printed 6 copies of the sign and weathered them with the airbrush before cutting them out so I could select the best of the bunch. I believe weathering before cutting so prevented the paper from curling and the resulting sign sits quite flat against the building.

I’m very happy with how this turned out and I can now say that all of the structures are done!

mill21.jpg

mill22.jpg

milldonesmall.jpgI spent the majority of the past week trying to clean the basement and get my airbrush working. I’m happy to report that the cleaning is done, and I finally have a usable airbrush! I’ve owned the same Badger airbrush for 17+ years and it’s worked great – the issue is the compressor. For as long as I’ve owned the airbrush I’ve also owned a very noisy compressor which I’ve been unable to use as the noise conflicts with the ‘tender sensibilities’ of the family. I finally visited the local TSC store and bought an 11 gallon air pig. It only takes about 2 minutes to fill the pig, and once filled, it lasts about 15-20 minutes. Finally, a silent airbrush!

I didn’t bother to add much in the way of detail to the mill as I’m not too interested in making a hyper-detailed model at this stage – only a suitable industry facade. I decided that I would try modeling a tar paper roof and elected to use some 320 grit sandpaper. I had used sandpaper on one of the houses and was pleased with the results, however this time I wasn’t so pleased – the sandpaper is too thick. When I had applied it as a single sheet it worked well – suitable texture and good colour, however as I layered each course on the roof, the seam seemed too thick, likewise the ‘yellow’ paper colour showed through on the edges. I finally had to airbrush the roof with a dirty black in an attempt to unify everything. Overall it looks fine, but I won’t use sandpaper again.

I weathered the building with an ink/alcohol wash and added a few light mists of dust, dirt and grime in an attempt to add a touch of weathering – nothing fancy, just enough to dull the colour and make the structure receded into its surroundings.

One of the ‘clever’ things I decided to do was to suggest the posts supporting the loading dock with groups of weeds. Gluing each of the posts under the overhang parallel and true proved to be an exercise in extreme patience, so I cheated and suggested the posts with bushes.

I think I need another smaller office building to accompany the mill – it seems too isolated and desolate… Back to the drafting table!

milldone1.jpg

milldone2.jpg

milldone3.jpg